Note:
Move the code to Github: https://github.com/giri-jeedigunta/custom-directions-panel-google-maps-apiv3
[Edited on June 2017]: To use the Google Maps JavaScript API Versions 3.27 and above, you must generate your own API key and add a list of domains you intend to use this API. More details – https://developers.google.com/maps/documentation/javascript/get-api-key
————————————————————————————————–
I’ve been working a lot on Google Maps API V3 these days and most recently worked on the get directions. So I thought I will put up a small tutorial which covers the below:
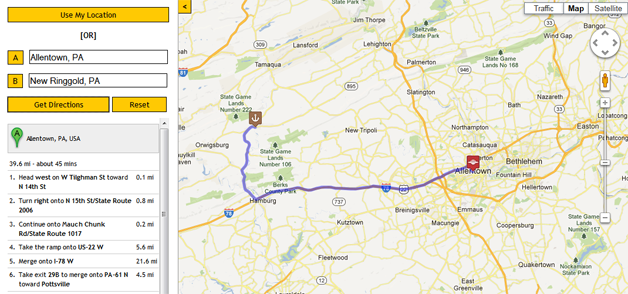
- Google Maps like Directions Panel with Toggle option
- Custom Direction Markers
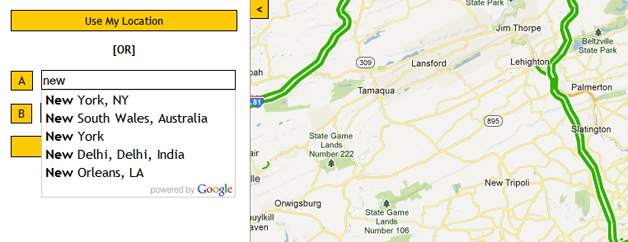
- Autocomplete Integration (Google Places API)
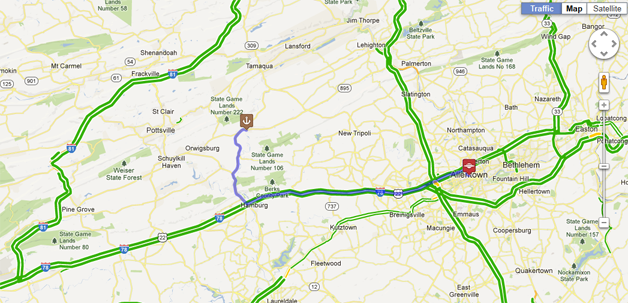
- Traffic Layer Integration (Adding Custom Control To Map)
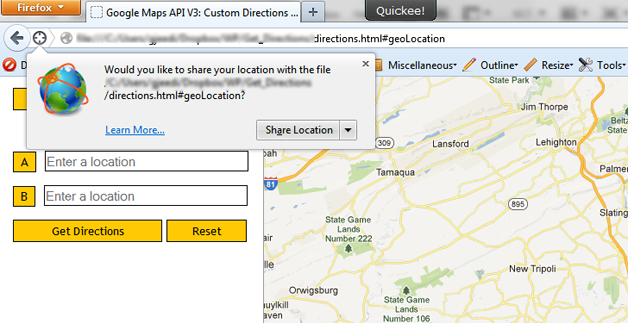
- HTML 5 GeoLocation, The Google Geocoding API Integration
- Download the complete code

Prerequisites: Knowledge on XHTML / HTML5, CSS, Good understanding of JS / jQuery is required.
For Map Basics refer: Google Maps API Integration
Custom Directions Panel or Google Maps Like Direction Panel:
Directions Setup Basic:
DirectionsService() is an asynchronous service comes along with the Google Maps API V3 which will generate the directions results upon providing the appropriate direction requests(source and destination). This service will generate a JSON as output, to render this JSON we can use the default rendering option DirectionsRenderer() provided in the API or we can also use the routes object to manually render each and every detail. I’ve used the DirectionsRenderer() option in this example.
Here is a glance at the code for the above two services. These needs to be setup once the map is initialized.
directionsSetup = function() {
	directionsService = new google.maps.DirectionsService();
	directionsDisplay = new google.maps.DirectionsRenderer({
		suppressMarkers: true
	});

	directionsDisplay.setMap(map);
	directionsDisplay.setPanel($Selectors.dirSteps[0]);
}, // direstionsSetup Ends
Get Directions:
Also, in the above code I’ve passed the option "suppressMarkers: true" in the DirectionsRenderer service which will suppress the default map marker images provided by Google and allows us to use the custom marker images.
The below function helps to generate the directions by taking the source and destination values from the input fields in the HTML or geolocation and passes the values to directions service, on success it will generate a response.
The div where the response needs to be rendered should be defined using: directionsDisplay.setPanel($Selectors.dirSteps[0])
Along with the setPanel we also need setDiretions to display the response in the div.
directionsDisplay.setDirections(response)
The response contains route object which will contain all the direction details like start / end position coordinates, waypoints and lot of other details.
Tip: If you want to completely customize the look and feel of the direction steps you need to use the route object to extract the details like, position, distance, route text etc,. and style them accordingly. If you need more details on this just leave a comment I can help you with whatever I know.
directionsRender = function(source, destination) {
	var request = {
		origin: source,
		destination: destination,
		provideRouteAlternatives: false,
		travelMode: google.maps.DirectionsTravelMode.DRIVING
	};

	directionsService.route(request, function(response, status) {
		if (status == google.maps.DirectionsStatus.OK) {
			directionsDisplay.setDirections(response);
			var _route = response.routes[0].legs[0];
			pinA = new google.maps.Marker({
				position: _route.start_location,
				map: map,
				icon: markerA
			}),
			pinB = new google.maps.Marker({
				position: _route.end_location,
				map: map,
				icon: markerB
			});
		}
	});
}, // directionsRender Ends
A detailed documentation on the DirectionsService is available here.
Custom Direction Markers
To customize the makers on the map we need to define them using the below code:
Defining Custom Marker Images:
var markerA = new google.maps.MarkerImage('m1.png',
		new google.maps.Size(24, 27),
		new google.maps.Point(0, 0),
		new google.maps.Point(12, 27));
var markerB = new google.maps.MarkerImage('m2.png',
		new google.maps.Size(24, 28),
		new google.maps.Point(0, 0),
		new google.maps.Point(12, 28))
Replacing the Markers on the Map:
Once the marker images are defined we can simple map then to the A and B markers on the map using the Marker object like shown below:
Here I have used the route object and manually setup the start and end markers.
Important: If you don’t use the below code you will not see any markers on the Map at all.
var _route = response.routes[0].legs[0];
pinA = new google.maps.Marker({
	position: _route.start_location,
	map: map,
	icon: markerA
});
pinB = new google.maps.Marker({
	position: _route.end_location,
	map: map,
	icon: markerB
});
Autocomplete Integration (Google Places API):
Autocomplete or the Google Places API is the most easiest to integrate. This is a really powerful feature and you can do a whole bunch of things with it.
Here is a glace at the code. It’s very simple and straight forward all you need to do is pass the input field.
autoCompleteSetup = function() {
	autoSrc = new google.maps.places.Autocomplete($Selectors.dirSrc[0]);
	autoDest = new google.maps.places.Autocomplete($Selectors.dirDst[0]);
}, // autoCompleteSetup Ends
Traffic Layer Integration (Adding Custom Control To Map)
There is no straight forward parameter / code for traffic layer integration. You need to setup a custom map control and bind it with an event to enable and disable the traffic layer.
Good thing is it’s not that complicated at all. Have a look at the code below:
trafficSetup = function() {
  // Creating a Custom Control and appending it to the map
  var controlDiv = document.createElement('div'),
	  controlUI = document.createElement('div'),
	  trafficLayer = new google.maps.TrafficLayer();

  jQuery(controlDiv).addClass('gmap-control-container').addClass('gmnoprint');
  jQuery(controlUI).text('Traffic').addClass('gmap-control');
  jQuery(controlDiv).append(controlUI);

  // Traffic Btn Click Event
  google.maps.event.addDomListener(controlUI, 'click', function() {
	  if (typeof trafficLayer.getMap() == 'undefined' || trafficLayer.getMap() === null) {
		  jQuery(controlUI).addClass('gmap-control-active');
		  trafficLayer.setMap(map);
	  } else {
		  trafficLayer.setMap(null);
		  jQuery(controlUI).removeClass('gmap-control-active');
	  }
  });
  map.controls[google.maps.ControlPosition.TOP_RIGHT].push(controlDiv);
}, // trafficSetup Ends
Learn more about Custom Map Controls Here.
var trafficLayer = new google.maps.TrafficLayer();
trafficLayer.setMap(map);
The above code will setup the traffic layer on top of the map. But once the traffic layer is set up you don’t have any direct option to disable it. Hence I have a custom control in place which helps me to easily enable and disable the traffic layer.
I’ve learned all about traffic integration from this tutorial. Pieter Vogelaar the author of the tutorial also included the code to display details of the traffic legends.
HTML 5 GeoLocation, The Google Geocoding API Integration
The geolocation API lets you share your location(latitude and longitude) once the user allows the api to track the location we can pass the coordinates to the Google Geocoding API and get a formatted address.
Invoking the HTML 5 Geolocation:
$Selectors.useGPSBtn.on('click', function(e) {
	if (navigator.geolocation) {
		navigator.geolocation.getCurrentPosition(function(position) {
			fetchAddress(position);
		});
	}
});
Using the Google Geocoding API:
fetchAddress = function(p) {
	var Position = new google.maps.LatLng(p.coords.latitude, p.coords.longitude),
		Locater = new google.maps.Geocoder();

	Locater.geocode({'latLng': Position}, function (results, status) {
		if (status == google.maps.GeocoderStatus.OK) {
			var _r = results[0];
			$Selectors.dirSrc.val(_r.formatted_address);
		}
	});
} // fetchAddress Ends
This tutorial is still a work in progress. My intention is to just give a basic idea on how we can put things together. Any feedback is welcome. Please comment or email me for any questions.
Click Here to download the complete code.
Good Luck!


Thanks so much. The script is so nice and clear, that even a beginner like me was able to understand it enough to customise it. Cheers.
This is great!
“Tip: If you want to completely customize the look and feel of the direction steps you need to use the route object to extract the details like, position, distance, route text etc,. and style them accordingly. If you need more details on this just leave a comment I can help you with whatever I know.”
Could you help me with this part? Google Maps docs doesn’t mention of route object.
Hey sorry for the delayed response. The google maps version api is an older version. I will look through the docs and get back to you. if you were able to solve it please do share your learnings =)
Hi,
I’m trying to get the directionsPanel to only display the text for one of the routes of my choosing (from provide route alternatives = true)
Can you help me with that?
I figured out a way to do it.
i reassigned the response.routes array to only contain the route that i wanted the directions panel for.
Great thanks for sharing !!!
Sir, you’re a lifesaver this idea is what I have exactly needed for my studies! 🙂
Hi ,
please i am facing some problem while uploading it on server but on my local machine it is working fine . please help me to resolve this ,thanks .my site url is http://taxiservicekarnal.com/directions.html
There had been some recent changes to the Maps API. You will need to obtain a API key for your domain / project. See the details here: https://developers.google.com/maps/documentation/javascript/get-api-key. Also the same error is shown in your browser console.
Hi, thank you the tutorial, but it doesn’t work online for me, i have got an API but still same problem, and to test the API, i have changed the map with a sample from google and it’s work just fine, do you have any idea what’s the problem could be, Thanks
Hi ,
can we change(custom) the start and end image in panel (table) of step by step direction detail.
hello , thanks for great tutorial
i have small problem here , this load map correctly and works perfectly but i want to show my current location when page load instead of clicking button , it worked for me when i redirect page again to
window.location.href = ‘Directions.html#geoLocation’;
when page load , but i don’t want to redirect , just need to show on start up . if you can help me with this
thanks
how to update input address field after the directions dragend?i.e address of current marker start and end locations on text input label.. please suggest me with code…
Please refer this example: http://gmaps-samples-v3.googlecode.com/svn/trunk/draggable-markers/draggable-markers.html
hey thanks for the link but i have this type and i can get the code also but i did get about the draggable directions with start and end markers..help needed in this..thanks in advance..
It seems there is a little incompability between jquery 1.8.3 and jquery > 1.9 . The toggle don’t work if using jquery > 1.9.
Excellent tutorial!! it helped me alot… In your tutorial user can get only one route from source to destination.. I want to get multiple paths from one source to one destination,, how to do this please help me
Can you tell me if i want to add draggable option for route, then how i will be able to add that feature?
Apologies for the delayed response here is an example I found for dragable markers : http://gmaps-samples-v3.googlecode.com/svn/trunk/draggable-markers/draggable-markers.html
Working on a volunteer project for the Sierra Club and stumbled BACK across this tutorial. The first time I found it, I had no jQuery exposure and couldn’t figure out what was going on, and it became lost to me over time. Looking for some tips on how to put a “Get Directions” button in an Infobox (not InfoWindow), I found another tutorial of yours and was so pleased to find your panel tut as well!
I built my own panel using jQuery UI and it works well enough, but your code is sooooo much cleaner and will serve as a splendid model for me. I like that you wrap it all up in one function.
If you have some time, could you explain the very last line for me? (window.mapDemo = window.mapDemo || {}, jQuery);
I’m glad this tutorial was helpful =). In the last line what I’m trying to do is create an object called mapDemo. But before doing that I’m checking if it’s already available in window scope if not creating a new object. I’ve used a Javascript coding Pattern called IIFE. You can read a great detail about it here: http://gregfranko.com/blog/i-love-my-iife/
Fantastic work- its perfect for my mobile app….”THANK YOU”
Hello,
Thank you for this tutorial, but I am having a issue hooking this code up to a drupal installation. Let me know if I have missed anything: I have added the google map api, working with query 1.8.3, then I copied the same html mark-up and called the mapping script at the bottom of the page. Right now it still seems to not be reading the mapping script.
Any ideas are welcome,
Thanks
If you can please share a working link I can have a look at it and see if I can be of any help.
I made a quick install of the issue. This is drupal 7 with a Bootstrap theme. add your css as map.css along with eh google map api in the head and and the javascript files as map.js at the bottom of the body.
http://mytest.redcitycreative.com/
Thanks
Hi guys,
this script is spectacular, but it is possible that the steps of the directions, do not appear to trace the route but appear a button “show route” and click open a popup with path and possibilide printing or to send to email?
Any ideia how to do this? 🙂
Many thank´s
Nuno P
hi guys,
I need this kind of application:
– an app that gets my location and shows it with a marker on Google map.
– this app should have a button and when I click on it:
It select from my database nearest restaurants (within any range, maybe 1 miles) and show them with markers on the map.
=>of course restaurants are stored in the database with their names and coordinates (latitude & longitude).
If anyone ever seen any tutorial to do such an app, please tell me.
Thx
Excellent tutorial. How could we change the marker B to a set destination and add a marker in for this destination by default?
This would then make for a great contact page map and the user only needs to enter their location in for directions.
You can have your destination hard coded in the value attribute like this: value=”New York, NY, United States” in your input field.
Hi Admin,
Hardcoding the destination value works. The point is about displaying a destination marker initially on the map. By using your code, the initial map doesn’t show any marker. Markers appear after direction search. I want to show a default (or custom) marker on Destination when the page loads.
This tutorial helped me with a project I was working on.
Hey just wondering if you know of a way to customize the content of the directions text panel. I see that within the response I have an object ‘panel’, and within that there is a ‘draggable’ that I assume if I could change to ‘true’ would mean you could drag the points to change the order of your route (as is available on the main google maps site). Also, looking for a way to only display the start, end and waypoints (not step by step directions) in text (draggable), and the entire route on the map.
Any help would be appreciated.
Thanks.
i want to use waypoint after every 1km how to do this plz some body help…….Kindly help me plz
Please refer this conversation from stackoverflow.com on adding markers along the way http://stackoverflow.com/questions/9594598/add-markers-along-a-route